-
Shop
- Adidas
- Advanced Technologies
- AI Skills
- AI Skills Mastery 2026 Collection
- Bathroom
- Best-Sellers
- Calvin Klein
- Car Accessories
- Confidence
- Dating & Social Skills
- Digital Resources
- AI & Technology
- Beauty
- Car Buying & Ownership
- Cozy Feast Collection
- Electronics & Technology
- Financial Education
- Hobbies
- Home Styling & Organization
- Kitchen & Recipes
- Mindset
- Online Business
- Parenting & Child Development
- Personal Style & Fashion
- Pet Lifestyle & Wellness
- Smart Life with AI
- Travel Planning
- Wellness
- Yoga & Fitness
- Education & Learning
- Family & Parenting
- Fashion
- Alexander McQueen
- Bags
- Bags & Wallets
- Balenciaga
- Belts
- Blazers
- Blouses & Shirts
- Bottega Veneta
- Brunello Cucinelli
- Burberry
- Chanel
- Chloé
- Dior
- Dolce & Gabbana
- Dresses
- Etro
- Fendi
- Gucci
- Hats & Hair Accessories
- Jacquemus
- Jewelry
- Jil Sander
- Keychains
- Kiton
- Luggage
- Luggage Bags
- Miu Miu
- Off-White
- Outerwear
- Prada
- Rick Owens
- Saint Laurent
- Scarves
- Shoes
- Socks & Tights
- Sunglasses
- The Row
- Tom Ford
- Valentino
- Valentino Garavani
- Versace
- Vivienne Westwood
- Watches
- Fashion Accessories
- Furniture
- Gadgets
- Health & Beauty
- Health & Wellness
- Home & Garden
- Home Decor
- Home Electronics
- Home Supplies
- Kids & Babies
- Kitchen
- Kitchen Best-Sellers
- Lighting
- Online Business for Beginners
- Patio, Lawn & Garden
- Personal Growth
- Pet Care
- Pet Supplies
- Pets
- Smart Amazon Shopping
- Smart Home Living Guides
- Sport & Outdoors
- Stress Relief & Relaxation
- Super Deals
- TikTok Growth & Monetization Mastery
- Travel
- Travel & Adventure
- Wealth
- Wealth Building
- Budgeting & Saving
- Cryptocurrency Investing
- Debt Management
- Entrepreneurship & Business Growth
- Family Finance & Budgeting
- Financial Independence
- Financial Mindset & Psychology
- Financial Planning
- Frugal Living & Expense Hacks
- Goal Setting
- High-Income Skills
- Investing Basics
- Leadership
- Motivation
- Networking & Mentorship
- Passive Income Strategies
- Real Estate Investing
- Side Hustles
- Stock Market Investing
- Popular
- Best deals
- Blog
Car Emergency Kit Checklist: Tools, Safety & Seasonal Gear
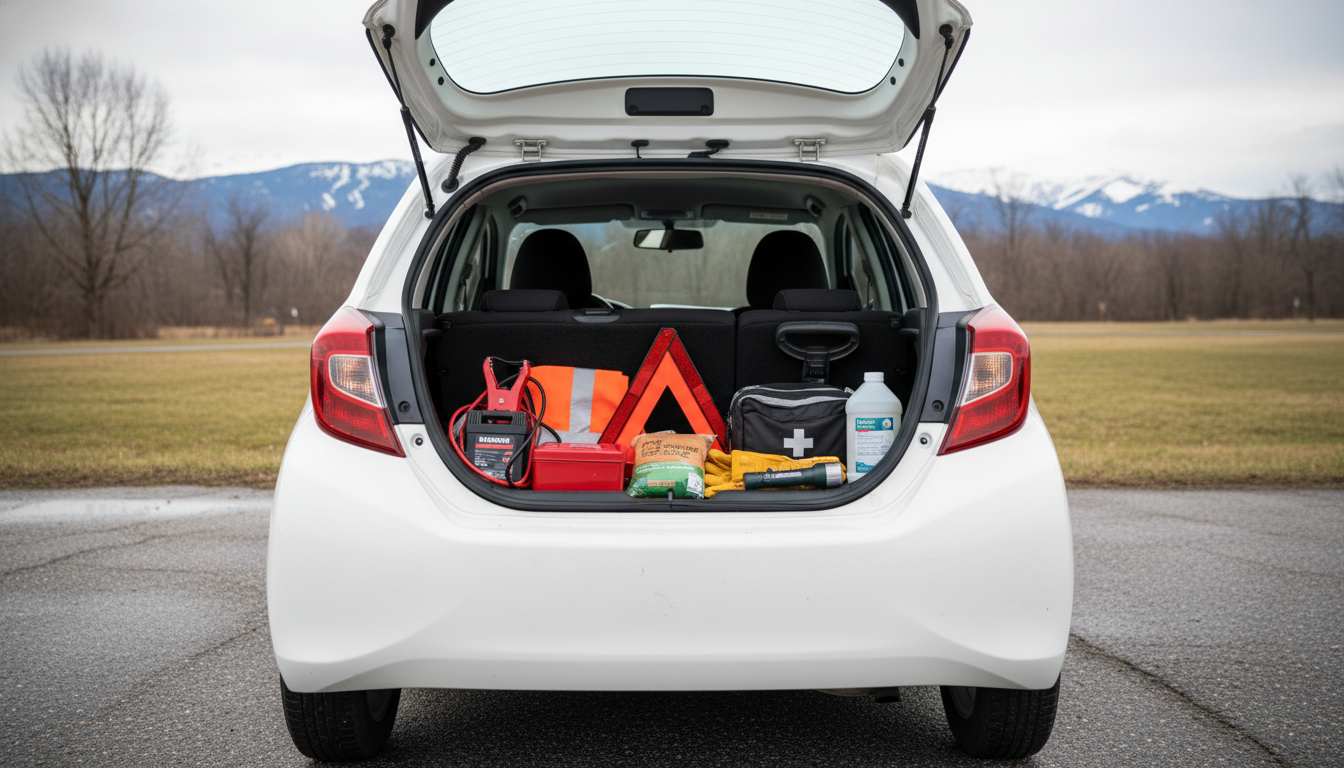
Your Trunk’s Insurance Policy: The Ultimate Checklist for Your Car Emergency Kit
A well-built car emergency kit turns common roadside problems—dead batteries, flats, bad weather, minor injuries—into manageable inconveniences. Use this checklist to build a trunk kit that fits daily commutes, road trips, and seasonal conditions, then set a simple schedule to keep everything current and ready.
Start with the scenarios that actually happen
The best kit isn’t the biggest—it’s the one that matches what drivers deal with most often, plus the conditions where you live and travel.
- Breakdowns: dead battery, overheating, blown fuse, stalled engine
- Tires: slow leak, full flat, missing tools, unsafe shoulder conditions
- Weather: sudden cold, extreme heat, heavy rain, snow/ice, wildfire smoke
- Visibility: night stops, fog, reflective hazards, low roadside lighting
- People needs: minor injuries, allergies, kids/pets, medication timing
- Phone gaps: low signal, dead battery, damaged cable, lost charger
As a baseline, follow the readiness guidance from the NHTSA Emergency Roadside Kit, then customize for your route and season.
The core kit: safety and visibility first
Before you worry about tools, assume you may need to step out on a narrow shoulder with traffic moving fast. Visibility and “be-seen” gear should be reachable and simple to use.
- Reflective warning triangles or LED road flares to alert traffic (often safer than traditional flares)
- High-visibility vest for the driver and an extra for passengers
- Quality flashlight/headlamp with fresh batteries (a headlamp keeps hands free)
- Work gloves (cut-resistant or sturdy mechanic gloves) for tire changes and debris
- Emergency whistle and a bright, waterproof notepad/marker for leaving messages
- Compact fire extinguisher rated for automotive use; store securely
Quick placement guide for roadside visibility
| Item | Where to place it (typical roadside) | Notes |
|---|---|---|
| Warning triangles | Behind vehicle along traffic flow | Follow local guidance; adjust for curves/hills |
| LED flares | Staggered behind vehicle | Use multiple points to create a visible taper |
| Hi-vis vest | On person before exiting | Keep in cabin, not buried in trunk |
| Flashlight/headlamp | On person before exiting | Hands-free preferred at night |
Tools and vehicle basics for common fixes
Most “roadside problems” are battery, tire, or minor mechanical issues. Pack for fast diagnostics and safe, basic fixes—without overloading your trunk with rarely used gear.
- Jumper cables or a portable jump starter (practice connecting safely before needing it)
- Tire pressure gauge and compact air compressor; check the spare’s pressure regularly
- Tire plug kit and valve stem tool (for those comfortable with basic tire repairs)
- Jack, lug wrench, and wheel lock key if applicable; confirm fit for the vehicle
- Multi-tool or basic tool roll: screwdrivers, pliers, adjustable wrench, zip ties
- Duct tape, electrical tape, bungee cords, and a small roll of shop towels
- Spare fuses and a fuse puller; match the vehicle’s fuse types
- Tow strap (rated appropriately) and a small traction aid (sand/traction boards/cat litter depending on climate)
If winter driving is part of your year, add cold-weather traction and review seasonal preparedness tips from AAA.
Medical and personal care essentials
Even a short delay can become stressful if someone is bleeding, nauseated, or cold. A compact medical-and-care pouch helps you stabilize minor issues and stay comfortable while waiting.
- First-aid kit with bandages, gauze, tape, antiseptic wipes, tweezers, scissors
- Nitrile gloves and a CPR face shield (compact and useful in true emergencies)
- Pain relief, antihistamine, and any personal prescriptions stored per label guidance
- Hand sanitizer, wet wipes, and a small pack of tissues
- Emergency blanket and/or compact sleeping bag (season-dependent)
- Reusable water bottle plus sealed water pouches; rotate on a schedule
- Nonperishable snacks (bars, nuts) with attention to heat sensitivity
For first-aid supply basics, the American Red Cross first-aid kit supply list is a solid reference.
Seasonal add-ons: build two mini-kits
Instead of rebuilding your whole trunk every few months, create two labeled zip bags you can swap in minutes. Your “core kit” stays the same; the add-ons change with temperature, precipitation, and air quality.
If cold sensitivity is a recurring issue for you or a frequent passenger, keep a warmth plan alongside your winter bag. The digital guide Cold Hands, Warm Clues can be a handy reference for staying comfortable when temperatures drop.
Power, navigation, and communication backups
Packing and maintenance so the kit stays usable
Fast maintenance schedule
| When | What to check | Typical actions |
|---|---|---|
| Monthly | Power bank, flashlight/headlamp | Recharge/replace batteries |
| Quarterly | First-aid, water, snacks | Rotate items nearing expiration |
| Season change | Seasonal add-on kit | Swap winter/summer bags |
| Before road trips | Spare tire, jack/tools, visibility gear | Confirm pressure and tool fit |
Printable checklist for the glovebox and trunk
If you want a ready-to-print layout, use this Printable emergency kit checklist to build your kit and track your maintenance dates in one place.
FAQ
What should be in a basic car emergency kit?
Start with visibility and safety gear, then add tire and battery support, basic tools, a first-aid pouch, water/snacks, and phone-power backups. Expand with seasonal items based on your climate and typical routes.
How often should a car emergency kit be checked or replaced?
Do a quick monthly power check for lights and power banks, rotate consumables quarterly, and review everything at season changes or before long trips. Replace any used or opened items immediately so the kit stays complete.
Where should emergency items be stored in the car?
Keep “exit-fast” items in the cabin where you can reach them before stepping out, and secure the main kit in the trunk so it doesn’t slide during braking. Avoid loose tools and store liquids/medical supplies in sealed pouches.
Recommended for you


What’s in a Car Emergency Kit? Checklist & Tips
May 25, 2026













Leave a comment